Lesson 01: Purpose and Setup
What’s the goal?
As mentioned in the repo README, this is a project to teach myself software 3D rendering techniques by building a 3D triangle rasterizer entirely from scratch. To begin with, I wanted to have a minimal windowing system. I’m on a Mac at the moment, but don’t know Objective-C which Apple uses for its system libraries and finding out how to write a framebuffer to the screen was proving to be too obnoxious. I found Fenster to be the most minimal framebuffer library, offering only a cross-platform window, framebuffer, mouse and keyboard handling. At around 300 lines it’s very readable and mirrors my desire to avoid the abstractions of 3D APIs by doing the same thing for drawing pixels to the screen. For the minimal needs of this project, Fenster is fine, but if you want to try to make a more full-featured application I would recommend looking at Raylib or SDL.
Aside from teaching myself, I find it enjoyable to share my discoveries with others and also find it useful to help more clearly order and document my thought processes. I’ll try to break each tutorial lesson into small steps and guide you to write your own solution instead of copying mine or asking an AI to code it. The only way to learn something is to struggle with it. Turning to quick answers robs us of the ability to grow our thinking and learning ability.
What you should know
This tutorial series assumes you have a working knowledge of the C programming language and a passing familiarity with basic math concepts like the Cartesian coordinate system, the unit circle and the three basic trigonometric functions. I’ll go over the little bit of extra math needed such as vectors and matrices.
Aside from the C standard library we should only need the Fenster and STB Image header files, both of which are single source files with no external dependencies that we can include directly in our project directories without having to link to any external system libraries. I’ll include a Makefile in the project source that should compile on Windows, Linux and Mac, but on Windows this might require some extra work. If you have Windows 10 you can install Windows Subsystem for Linux (WSL) which comes installed on Windows 11 by default and run sudo apt install make. Because we’re not linking to any external system installed libraries there should be no added complexity for compiling with a visual IDE like Visual Studio if you’re uncomfortable using a terminal.
Downloading and compiling the Fenster library
The simplest method is to just copy fenster.h to your project directory. I like to store headers in the /include directory of my project and source files in /src which is what I will assume going forward. This example of a basic Fenster program is based on the article listed above by the creator:
#include "../include/fenster.h"

#define WIDTH  600
#define HEIGHT 400

uint32_t buffer[WIDTH * HEIGHT];

int main()
{
    struct fenster window = {
        .title = "Hello, World!",
        .width = WIDTH,
        .height = HEIGHT,
        .buf    = buffer
    };

    // Open a system window using the given window specifications
    if (fenster_open(&window) < 0) return 1;

    while (fenster_loop(&window) == 0) {
        ;
    }
    fenster_close(&window);
}
To compile, run the command cc -I include src/main.c -o softrend -framework cocoa on Mac, cc -I include src/main.c -o softrend -lX11 on Linux and cc -I include src/main.c -o softrend -lgdi32 on Windows. Going forward, I’ll be using a cross-platform Makefile, you can download it here and compile by typing make with the project Makefile in the root directory, and run the binary with ./softrend.
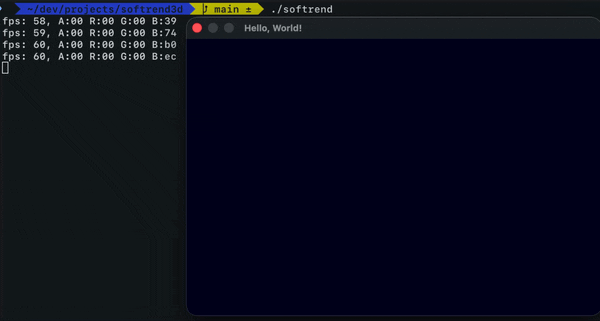
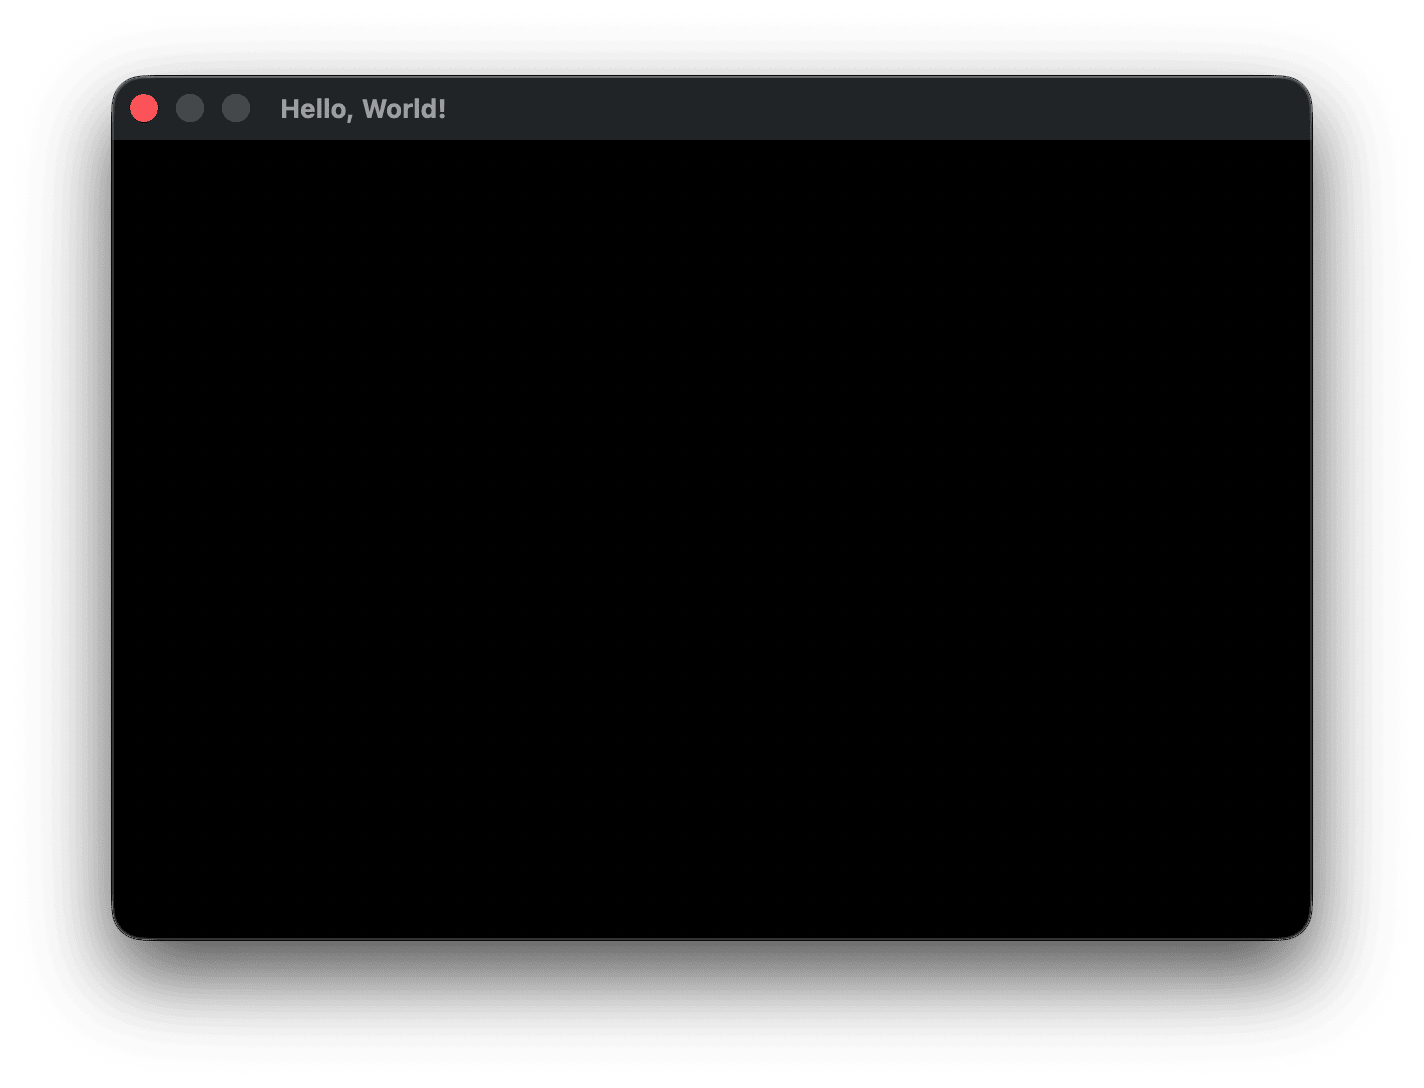
You should see a 600x400 window pop up with all black contents and a window title of “Hello, World!”:
Drawing to the display
What’s a framebuffer?
This code should be mostly self-explanatory save for the fenster.buf field that takes an array of type uint32_t. Fenster passes this framebuffer array to the underlying operating system to write to the display.
A framebuffer is a contiguous section of RAM that represents all of the pixels on the screen. Most modern applications use 32-bits for each pixel in either ARGB or RGBA order, with 1 byte per channel (R=red, G=green, B=blue, A=alpha or transparency). Often they will use structs with separate fields for each channel, but Fenster packs all color channels into a single 4 byte word. When converting between different libraries or formats, you need to be specific about the order of color channels.

The image above shows a 32-bit ARGB pixel in little-endian notation. The high order byte represents the alpha transparency mask in bits 24-31. When all of the bits are set to 0xFF in hexadecimal (or 255 in decimal, 11111111 in binary) then the image is fully opaque. When the bits are set to 0 (0x00 in hex) the image is fully transparent. Bits 16-23 represent the red channel, bits 8-15 the green channel, and bits 0-7 the blue channel. It’ll be a while before we need to deal with transparency, and in fact Fenster ignores the alpha byte when sending the buffer to the system, so the only transparency blending on our buffer will have to be taken care of by ourselves. For the time being, the alpha channel can be set to 0, or 0xFF, or anything in between, both our own code and Fenster (and the underlying window system) will ignore it.
Filling the buffer
If we want to represent fully opaque red we’d use 0xFFFF0000, with bits 24-31 (the high order, most significant byte) representing the alpha value and the second byte the red value (fully red). So the alpha channel is set to fully opaque (again, not that we’re using it) as 0xFF and the red channel to full red (also 0xFF). We can define a constant at the top of the file next to our #defines:
#define HEIGHT 400

const uint32_t RED = 0xFFFF0000;

uint32_t buffer[WIDTH * HEIGHT];
and then inside main we can fill the buffer once before the Fenster window loop:
        .buf    = buffer
    };

    for (int i = 0; i < WIDTH * HEIGHT; i++) {
        buffer[i] = RED;
    }

    // Open a system window using the given window specifications
The Fenster event loop
Like most windowing libraries, Fenster continuously loops over the system event queue, though in as simple a manner as possible, only presenting the window dimensions and title and framebuffer to the system and grabbing mouse and keyboard input values during each loop. If we only call fenster_open(&window) without continuously calling fenster_loop(&window) the application window will never open on macOS, while on Linux and Windows it should open but be unresponsive.
The while loop calling fenster_loop() triggers a framebuffer redraw each iteration. Since Fenster writes pixels directly from RAM to the display system, the GPU rendering pipeline is not involved. To track the frame time of the loop we can use fenster_time(), which returns the number of milliseconds since the Unix epoch (time since 00:00:00 UTC on 1 January 1970). For example:
    // Open a system window using the given window specifications
    if (fenster_open(&window) < 0) return 1;

    int64_t secondStart = fenster_time();
    int     frameCount  = 0;
    while (fenster_loop(&window) == 0) {
        // print FPS once a second
        frameCount++;
        if (fenster_time() - secondStart >= 1000) { // is elapsed time over 1000ms (1s)?
            printf("fps: %d\n", frameCount);
            frameCount  = 0;
            secondStart = fenster_time();
        }
    }

    fenster_close(&window);
Blitting or swapping the buffer
If you’re curious about how our buffer gets drawn to the display, read on, though it’s not necessary to remember these details other than to satisfy your curiosity.
In old school terms, copying our memory buffer to the display system’s memory is called blitting, taken from “Block Level Image Transfer”, aka BitBLT). The buffer being rendered to was known as the back buffer while the completed buffer being shown was the front buffer, and the user called a swap/present function that swapped the buffers at the end of each frame. In modern operating systems the underlying system compositor (Quartz on macOS, DWM on Windows, X or Wayland on Linux, though Fenster only supports X11) hides these details from us, except in specific circumstances, like using the Metal API on macOS to bypass the compositor in full screen mode to render directly to the display and reduce any overhead involving the compositor, or Windows using DirectX in full screen mode to similarly bypass the DWM compositor. This is why you see the screen flash to black and pause when switching out of full-screen mode in games on Windows, it’s the DWM compositor being reinitialized to take over drawing to the screen.
There is no need to explicitly call or register a drawing function to present our buffer to the system, Fenster handles that behind the scenes. If you’d like to read the author’s breakdown of how Fenster communicates with the underlying compositor to display graphics for each platform, read on.
Animating the buffer
On my system the console starts out printing a very high number (~700 fps) then settles around 120 fps, the refresh rate of my display. We filled the framebuffer window.buf with red pixels before calling the render loop. We can also change the buffer’s pixels inside the loop. Simply moving the for loop inside the fenster_loop doesn’t change what appears on the screen, it just means the buffer is getting overwritten with the same pixels each frame. We could change it so that the pixel value changes each loop:
            secondStart = fenster_time();
        }

        for (int i = 0; i < WIDTH * HEIGHT; i++) {
            buffer[i] += 1;
        }
    }

    fenster_close(&window);
Because we declared the buffer array globally it is 0 initialized and this code will add 1 to each pixel value. Starting with all channels at 0 the pixel is black, and as the blue channel ramps up from 0 to 255 the pixel shifts from black to full intensity blue. After the blue byte hits 255, adding 1 causes it to wrap back to 0 and carry into the green byte — a side effect of unsigned integer arithmetic wraparound. The cycle then repeats across the blue range, but with green now incremented by 1/255 of its full intensity. If we let the program run at 120 fps it would take approximately 39 hours to cycle through all 16,777,216 possible RGB values — one per frame, and ending in full intensity white at 0x00FFFFFF (when the pixel values reach 16,777,215) before wrapping back to the start of the RGB color values at RGB all set to 0. However it would not reset the pixel value itself back 0, but would continue looping with the next value at 0x01000000 with an alpha value of 1 and all other channels reset to 0 (full black).
You can remove the RED declaration at the top now as we’re iterating over pixel values starting at 0 - starting with the blue blue channel bits - we’ll be needing the RED identifier for something else later.
const uint32_t RED = 0xFFFF0000; // ← remove
Inspecting the pixel channel values
We’re changing the value of each 4 byte pixel by 1 each loop, and we’ve talked about what different bits in that pixel value mean, but it can be helpful to see it in practice. If we’re passing color information in ARGB little-endian order as we discussed, we can index into each channel and show its value during the loop. As with fps, it’ll be less obnoxious if we only do it once a second.
At the top of the file after the current #defines add:
#define HEIGHT 400

#define ALPHA 3
#define RED   2
#define GREEN 1
#define BLUE  0

uint32_t buffer[WIDTH * HEIGHT];
In the fps print loop that fires every second add:
        if (fenster_time() - secondStart >= 1000) { // is elapsed time over 1000ms (1s)?
            const uint8_t *bufferByteArray = (const uint8_t *)buffer;
            printf("fps: %d, A:%02x R:%02x G:%02x B:%02x\n",
                    frameCount,
                    bufferByteArray[ALPHA],
                    bufferByteArray[RED],
                    bufferByteArray[GREEN],
                    bufferByteArray[BLUE]);
            frameCount  = 0;
            secondStart = fenster_time();
        }
As an exercise, how would you increment one specific color channel instead of starting at pixel values of 0 and incrementing the blue values at the start?
Click for my solution
We can just steal our bufferByteArray channel accessing code and use it in the buffer fill loop: for (int i = 0; i < WIDTH * HEIGHT; i++) {
uint8_t *bufferByteArray = (uint8_t *)&buffer[i];
bufferByteArray[GREEN] += 1;
// buffer[i] += 1;
}
        for (int i = 0; i < WIDTH * HEIGHT; i++) {
            buffer[i] += 0x00000100; // increment green channel directly
            // buffer[i] += 1;
        }
You could sit and watch the green channel values slowly increase, but it’d be quite a while before you noticed the green tint effecting the blue. You might ask yourself at this point, how can I make this process take even longer?
Limiting Frame Rate (FPS)
If we want to limit the frame time to a specific desired value, we can add a few lines of code. We add a few #defines at the top of the file:
#define HEIGHT 400

#define FPS    60               // Targeted frame rate (frequency in hz)
#define FRAME_TIME (1000 / FPS) // Targeted frame duration (period in ms)

const uint32_t RED = 0xFFFF0000;
To the declarations before the window loop we add frameStart:
    int64_t secondStart = fenster_time();
    int64_t frameStart  = secondStart;
    int     frameCount  = 0;
and at the end of the loop:
            buffer[i] += 1;
        }

        // sleep until we reach desired FRAME_TIME
        int64_t remainingMS = frameStart + FRAME_TIME - fenster_time();
        if (remainingMS > 0) fenster_sleep(remainingMS);
        frameStart = fenster_time();
    }
As a point of curiosity, if we were taking 39 hours before to draw all possible RBG values we’d now take around 78 hours to iterate over all the colors values. Worth noting that the alpha value is ignored, so it actually would take us around 2.27 years before the alpha channel wrapped back to 0 for each pixel.